Analysis of Causes Behind Light Distortion in Glass Curtain Walls
Analysis of Causes Behind Light Distortion in Glass Curtain Walls 1. Introduction Glass curtain walls are widely used in modern buildings due to their bright
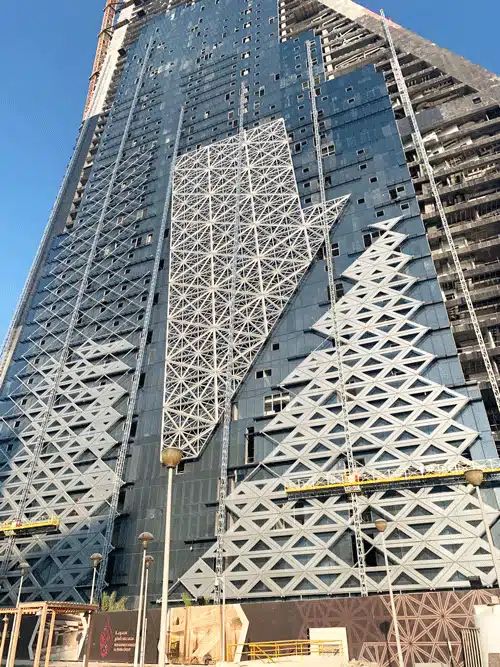
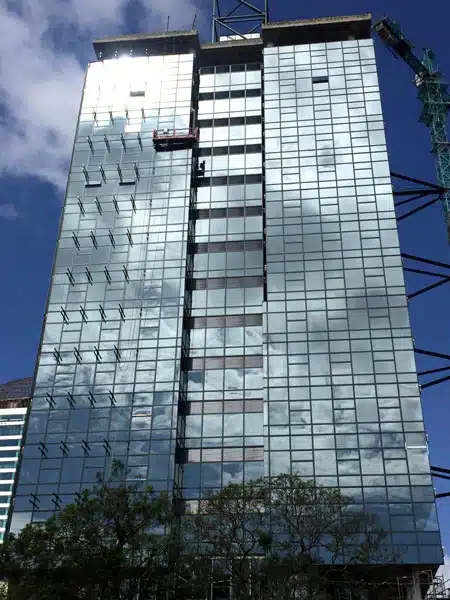
The unitized curtain wall system is known as a highly efficient and precise method of facade construction. And they are actually the pre-assembled panels installed directly onto the building structure. For optimal safety, long-term performance, and visual perfection, it’s essential to strictly follow the standardized workflow in the unitized curtain wall installation.
The following is a guide about the entire process of unitized curtain wall installation including: initial layout and bracket fixing, panel hoisting, sunshade assembly, and final cleaning. Besides, we also make the key procedures, safety measures, and quality control checkpoints clear.
1
Before any panels are lifted or brackets installed, accurate layout work sets the foundation for a successful installation. This stage determines how well the unitized curtain wall system aligns with the structural frame and architectural intent.
▶ Pre-calculate the finished dimensions of each unitized panel. This helps avoid oversized gaps that could lead to water leakage or irreparable issues.
▶ Use the building’s floor centerline as the reference and lay out panels symmetrically from the center towards both sides to minimize errors.
▶ Identify the center point of each façade and use a tape measure to divide the layout. After that, calculate and confirm the finished panel dimensions.
▶ At the rooftop corners, fix angle irons and mark the finished positions. Make sure that angle irons are fixed at all four corners.
▶ Use a plumb bob weighing over 2 kg. Next, cut a small groove at the angle iron marks to hold the steel wire securely. This step is to ensure true vertical alignment.
▶ After tightening the steel wire, verify that the top and bottom measurements match to confirm vertical accuracy without deviation.
✅ QC Tip For : Check vertical control every 2–3 floors to avoid accumulation of errors.
2
With layout already in place, it’s time to secure the structural foundation for each unit panel, that is, the anchor brackets. Proper bracket installation is important for both load transfer and long-term stability.
▶ Use the center point of the façade as the reference and divide equally to both sides. And then, calculate the overall panel layout at once instead of segment by segment to reduce cumulative errors.
▶ Stretch a flat control line to mark the horizontal position of brackets. Place each bracket according to the layout and mark the drilling points.
▶ Operate in teams of three: one marks the points, one drills, and one cleans holes and installs threaded rods.
▶ If rebar is encountered while drilling, adjust the hole position slightly. If unavoidable, add extra bolts for reinforcement as necessary.
▶ Clean the holes thoroughly before injecting chemical anchoring adhesive. Then insert the threaded rods and secure the brackets firmly. All rods must be tightly fixed to guarantee stability.
✅ QC Tip: The adhesive must fully fill the hole, and full curing must take place before any anchor is loaded.
3
Once materials arrive on site, proper handling can keep the panels in perfect conditions before any installation begins.
▶ Confirm the delivery time, quantity, and panel types in advance. Arrange forklifts and cranes. Also importantly, choose a spacious, safe, and easily accessible unloading area.
▶ Inspect the container for any damage to racks. And document any issues with photos.
▶ Use forklifts with extended forks for unloading. Secure the racks properly to prevent tipping.
▶ Maintain a safe distance between workers during unloading.
▶ After unloading, sort and store panels onto custom-made racks by floor level.
▶ Build unloading platforms at the floor edges. The platforms should be raised and reinforced so that panels can be hoisted safely.
✅ QC Tip: Check for panel damage immediately after unloading and record any issues before storage.
4
This stage brings all installation elements together and is important for achieving lasting waterproofing and structural performance. Workers must carry out this process very carefully, floor by floor.
▶ Workers wear helmets and harnesses, stay tied off with ropes. Set a warning line on the ground.
▶ Remove protective films, inspect waterproof gaskets, and fix the brackets securely.
▶ Use lifting equipment to hoist panels into position. Then check for level and plumb, adjust screws as needed, and apply sealant after fixing.
▶ After the first row is installed, align the second row panels about 5 cm above the first row before placement.
▶ Insert sealing strips, adjust the joint gaps, and then fix panels securely.
▶ Insert connection aluminum profiles into the side grooves of adjoining panels.
▶ Adjust the alignment of left and right panels before fixing and sealing the joints.
▶ Every three floors, recheck horizontal and vertical alignments. In addition, make adjustments as necessary to maintain a neat and uniform overall appearance.
✅ QC Tip: Confirm gasket position and compression before sealing to avoid water infiltration.
5
Firestopping is a critical step in both code compliance and occupant safety.
5.1 After panel installation, fix fireproof boards underneath each floor slab using cement nails or expansion bolts.
5.2 The fireproof boards must be installed level with the slab underside.
5.3 Fill gaps completely with fire-resistant rock wool, then cover with surface fire boards.
5.4 Create openings at panel bracket locations and seal them with galvanized steel sheets.
✅ QC Tip: Certified fire-resistant materials should be used, with full coverage of the slab edges.
Before any panels are lifted or brackets installed, accurate layout work sets the foundation for a successful installation. This stage determines how well the unitized curtain wall system aligns with the structural frame and architectural intent.
6
When installed precisely, sunshade panels are the main elements in enhancing aesthetics, reducing glare and improving thermal performance.
▶ During unitized panel installation, reserve openings for sunshade brackets.
▶ Ensure the suspended platform clearance exceeds the finished surface of the sunshade panels.
▶ After fixing Z-shaped clamps, secure square aluminum tubes.
▶ Install tubes sequentially from top to bottom to prevent damaging lower tubes.
▶ Fix the sunshade panels in order.
▶ Reinforce each sunshade panel with connecting clips.
▶ Use wooden padding and a mallet to gently install the final panel sections.
▶ Seal the tops and bottoms with aluminum composite panels.
▶ Apply sealant and fix them securely for a watertight finish.
✅ QC Tip: Pre-check alignment of shading arms before full panel installation.
7
Once above installation is complete, thorough cleaning and final inspection help the façade performs and presents as intended.
▶ Remove protective films and wipe down all interior surfaces with scrapers and cloths.
▶ Clean the exterior from top to bottom, remove sunshade films, and wash glass panels.
▶ Check gasket seals.
▶ Reinstall any loose ones. And use a small amount of silicone if necessary.
▶ Lower cradles to the ground daily and tension the cables slightly. It is to prevent swaying in high winds.
✅ QC Tip: Perform final gasket and sealant inspection under daylight to guarantee no visible defects are present.
Finally
Upon completion of all the above steps, the project is ready for final inspection and handover.
Analysis of Causes Behind Light Distortion in Glass Curtain Walls 1. Introduction Glass curtain walls are widely used in modern buildings due to their bright
All-Glass vs. Stick Curtain Wall: Best Choice for Atrium Lobbies Comparing Transparency, Performance, and Cost-Effectiveness in High-Rise Lobby Façades Walk into any major office tower
Buildings Live and Breathe with SunFrame Low-E Curtain Wall Systems At SunFrame, we see curtain walls and windows as the breathing system of a building
Glass Curtain Wall Component Fabrication and Sealing at SUNFRAME At SUNFRAME, we always adhere to the principle of “standardized production, refined management, and comprehensive quality